Our Healthy Homes Team have gathered the information below.
We hope you will find it useful to help improve your comfort at home and save on bills.
Attic room insulation specifications
Where existing underdrawn or flat ceiling is to be retained
- Provide and fix new insulated plasterboard:
- comprising 75mm thick phenolic insulation bonded to 12.5mm thick tapered edge plaster board, fixed in accordance with the manufacturer's instructions, with countersunk head dry lining screws, with minimum 25mm penetration in to existing timber rafters;
- or where limited headroom exists 50mm thick phenolic insulation bonded to 12.5mm thick tapered edge plasterboard fixed as above*.
All set to best line and level to receive 3mm skim coat of board finish plaster incorporating hessian scrim at joints and galvanised steel beads at corners, returns or stops, steel trowel smooth finish left to receive decoration by others.
(*Should ceiling heights not permit this reduced thickness to be installed. Further advice should be sought from the Home Improvement Service.)
- Provide and fix new insulated plasterboard:
- comprising 65mm thick PIR insulation bonded to 12.5mm thick tapered edge plaster board, fixed in accordance with the manufacturer's instructions, with countersunk head dry lining screws, with minimum 25mm penetration in to existing timber rafters*.
All set to best line and level to receive 3mm skim coat of board finish plaster incorporating hessian scrim at joints and galvanised steel beads at corners, returns or stops, steel trowel smooth finish left to receive decoration by others.
(*Suitable for reduced headroom situations. Should ceiling heights not permit this reduced thickness to be installed. Further advice should be sought from the Home Improvement Service.)
Where existing underdrawn or flat ceiling is to be removed
- Provide and fix new roof insulation board cut and friction fitted between rafters (generally at 400mm centres) 100mm thick*, phenolic core with low emissivity composite foil facings both sides and insulated plasterboard (comprising 25mm thick insulation and 12.5mm thick tapered edge plaster board, fixed with countersunk head dry lining screws, with minimum 25mm penetration in to existing timber rafters) or 60mm thick*, phenolic core with low emissivity composite foil facings both sides and insulated plasterboard (comprising 50mm thick insulation and 12.5 mm thick tapered edge plasterboard fixed as above, all set to best line and level to receive 3mm skim coat of board finish plaster incorporating hessian scrim at joints and galvanised steel beads at corners, returns or stops, steel trowel smooth finish left to receive decoration by others.
- Provide and fix new roof insulation board cut and friction fitted between rafters (generally at 400mm centres) 100mm thick*, PIR core with low emissivity composite foil facings both sides and insulated plasterboard (comprising 40mm thick insulation and 12.5mm thick tapered edge plaster board, fixed with countersunk head dry lining screws, with minimum 25mm penetration in to existing timber rafters) or 75mm thick*, PIR core with low emissivity composite foil facings both sides and insulated plasterboard (comprising 50mm thick insulation and 12.5 mm thick tapered edge plasterboard fixed as above, all set to best line and level to receive 3mm skim coat of board finish plaster incorporating hessian scrim at joints and galvanised steel beads at corners, returns or stops, steel trowel smooth finish left to receive decoration by others.
(*May require timber battens to be fixed to underside of rafters to ensure a 50mm air gap is maintained above insulation.)
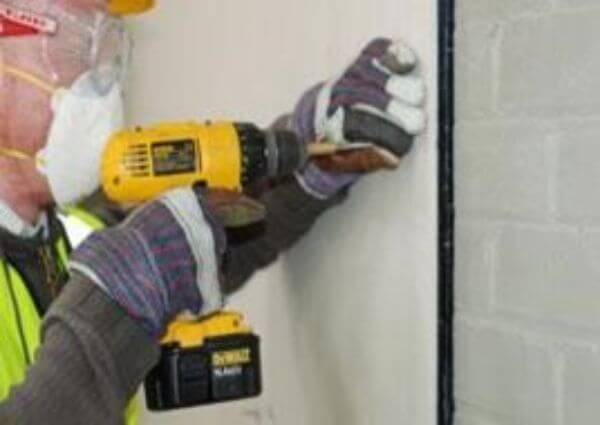
Where insulation is to be applied to solid masonry/new studwork to be erected
The contractor should provide his price on specification 1 or 2:
- Provide and fix new tanalised timber battens, 38mm thick x 50mm wide generally. (Contractor to check and confirm that the existing plaster/laths /timber battens are not damp / rotted and therefore not suitable to receive new thermal lining if this is the case the existing plaster lath and battens will require removal) Fixing to be by Hilti HUS 7.5mm universal screw anchors or similar. Battens and cross noggins generally set at not more than 600mm centres vertically and horizontally at floor and ceiling level, including all necessary additional members at door, window or other openings, incorporating plastic packers where necessary and set to receive new insulated plasterboard (comprising 60mm thick phenolic insulation bonded to 12.5mm thick tapered edge plaster board facing) fixed in accordance with manufacturer's instructions with countersunk head dry lining screws, which should be placed at 150mm centres and not less than 10mm from the edge of the board. minimum 25mm penetration into timber, all to receive 3mm skim coat of Board finish plaster incorporating scrim at all board joints and galvanised steel beads at corners, returns or stops, steel trowel smooth finish left to receive decoration by others.
- Provide and fix new tanalised timber battens, 38mm thick x 50mm wide generally. (Contractor to check and confirm that the existing plaster/laths /timber battens are not damp / rotted and therefore not suitable to receive new thermal lining, if this is the case the existing plaster lath and battens will require removal) Fixing to be by Hilti HUS 7.5mm universal screw anchors or similar. Battens and cross noggins generally set at not more than 600mm centres vertically and horizontally at floor and ceiling level, including all necessary additional members at door, window or other openings, incorporating plastic packers where necessary and set to receive new insulated plasterboard (comprising 65mm thick PIR insulation bonded to 12.5mm thick tapered edge plaster board facing) fixed in accordance with manufacturer's instructions with countersunk head dry lining screws, which should be placed at 150mm centres and not less than 10mm from the edge of the board, minimum 25mm penetration into timber, all to receive 3mm skim coat of Board finish plaster incorporating scrim at all board joints and galvanised steel beads at corners, returns or stops, steel trowel smooth finish left to receive decoration by others.
Where insulation is to be applied to existing studwork
The contractor should provide his price on specification 1 or 2:
- Rotted and therefore not suitable to receive new thermal lining, if this is the case these timbers will require removal) Provide and fix new insulated plasterboard (comprising 60mm thick phenolic insulation bonded to 12.5mm thick tapered edge plaster board facing) fixed in accordance with (Contractor to check and confirm that the existing timber studding is not manufacturer's instructions with countersunk head dry lining screws, which should be placed at 150mm centres and not less than 10mm from the edge of the board, minimum 25mm penetration into timber, all to receive 3mm skim coat of Board finish plaster incorporating scrim at all board joints and galvanised steel beads at corners, returns or stops, steel trowel smooth finish left to receive decoration by others.
- (Contractor to check and confirm that the existing timber studding is not rotted and therefore not suitable to receive new thermal lining, if this is the case these timbers will require removal) Provide and fix new insulated plasterboard (comprising 65mm thick PIR insulation bonded to 12.5mm thick tapered edge plaster board facing) fixed in accordance with manufacturer's instructions with countersunk head dry lining screws, which should be placed at 150mm centres and not less than 10mm from the edge of the board. minimum 25mm penetration into timber, all to receive 3mm skim coat of Board finish plaster incorporating scrim at all board joints and galvanised steel beads at corners, returns or stops, steel trowel smooth finish left to receive decoration by others.
Cavity wall insulation
For homes built from 1920 onwards, the external walls are normally:
- built with two layers of masonry;
- with a small gap known as a 'cavity' between them.
To insulate your home, the cavity is filled with one of the various products available.
If you do this work, it is an effective way to keep the warmth in your home and:
- You will use less energy, which reduces carbon dioxide emissions (CO2).
- It will save on your energy costs you.
- It can also help to reduce condensation in the home.
A survey of the property will need to be carried out. This will determine what form of insulation might be needed:
- fibre;
- polystyrene bead;
- or polyurethane foam.
Note: If rubble or stone ties are present it may not be possible to install any insulation.
The work is external, avoids any internal disruption and the process is straight forward.
- The installer drills small holes in the joints at regular intervals.
- The insulation material is blown into the cavity and the holes are re-pointed.
Many properties in Calderdale have non-standard stone cavities, it may be possible to insulate these following a survey.
For more information, visit: Cavity wall insulation (cse.org.uk).
Costs and savings
The estimated savings in this table are based on homes heated by gas:
| (October 2022 prices) | Typical cost (£) | Saving per year (£) |
|---|---|---|
| Detached house | 1,800 | 690 |
| Semi detached house | 1,000 | 395 |
| Mid-terrace house | 580 | 235 |
| Detached bungalow | 800 | 310 |
| Mid-floor flat | 395 | 180 |
(Source: Energy Saving Trust.)
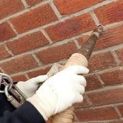
Fit a chimney balloon
This will help to keep heat in your home.
- It will stop warm air rising and cold air from coming down the chimney.
- It also absorbs sound, keeps animals and debris out, decreases weather infiltration and will lower your annual fuel costs.
The chimney balloon should:
- Not fret or rub against the chimney's walls, it should fit snuggly against them.
- Be placed where you can quickly access it to inflate and deflate it.
You should spread a sheet below the chimney as dust and soot could fall when you install the balloon.
- After you fully open the valve, attach the inflation tube to the valve.
- Blow some air into it until it begins to expand and has enough volume to be put in place.
- With the tube facing down and toward you, place the chimney balloon inside the chimney.
- As you inflate the balloon, check to see that it is positioned properly. To the widest part of the chimney, it will move a little.
- Do not inflate the balloon too much. Blow air through the tube or attach an air mattress pump to it to gently firm it up.
- Next, shut the valve and take out the inflated tube. After leaving overnight, check the balloon. If it has lost some air as the air cools, open the tap and add some more.
How to remove it
- First open the tap and let the air out, then gently remove the balloon.
- Despite being composed of durable plastic, it does not particularly enjoy rubbing up against the rough chimney walls.
- Roll it up and store it safely until you need to use it again. Ensure all the air has been released.
How to maintain it
- Every three months, check the chimney balloon to make sure it is fully inflated.
- If it is to be permanent, take it out each year to make sure debris does not gather on it.
- Friction against the chimney walls could result in little holes. Make sure holes are clear and dry before then cover them with adhesive tape.
- Check for wrinkles that could allow air to seep in.
Safety
- You must deflate and remove your chimney balloon before you light a fire. The balloon will swiftly contract and drop into the grate if a fire is started.
- The hand grip is not flammable and the bag is not likely to catch fire in the chimney.
Condensation, damp and mould
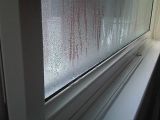
It is well known that in recent years some houses and flats have suffered from condensation. Walls, ceilings and at times floors become damp, discoloured and unpleasant due to mould growth.
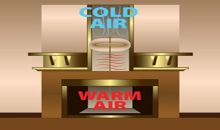
Why it happens
When warm, moist air meets a cold surface.
- It depends on how moist the air is and how cold the surface is.
- To some extent, both these depend on how the building is used.
When it happens
Usual in winter, because the building structure is cold and windows are open less, so moist air cannot escape.
Where it happens
- For short periods of time in bathrooms and kitchens, due to the steamy atmosphere.
- For long periods in unheated bedrooms.
- At times in cupboards and corners of rooms where the ventilation and movement of air is restricted.
- Damage can also happen to materials that are out of sight, such as in roofs.
What is important
The three main things are:
- Stop moist air spreading to other rooms from kitchens, bathrooms or where clothes are drying.
- Provide some ventilation to all rooms, so moist air can escape.
- Use heating reasonably.
How you can help to prevent serious condensation in your home
Reduce moisture content of room air
- Good ventilation of kitchens when you wash/dry clothes or cook is essential. If there is an extractor fan, use it! If windows are misting, leave the fan on until they are clear again.
- If there is not an extractor fan, open kitchen windows but keep the door closed as much as possible.
- After bathing, keep the bathroom window open and shut the door for long enough to dry off the room.
- In other rooms, provide some ventilation. In old houses, ventilation occurs via fireplace flues and draughty windows. In modern flats and houses enough ventilation does not happen unless a window or ventilator is open. This should be for a reasonable amount of time each day, most of the time a room is being used. Too much ventilation in cold weather is not comfortable and wastes heat. It just needs a slightly open window or ventilator on each side of the house. This would possibly be better on first floor, to aid cross ventilation. Where there is a choice, open the upper part, such as a top hung window. It should be enough they are open by just 1cm.
- Avoid the use of portable paraffin or gas heaters without a flue, as far as possible. Each litre of oil used produces around a litre of water vapour. If these heaters must be used, make sure that the room they are in is well ventilated.
- In rooms with gas, oil or solid fuel heating that uses a flue, it should be checked. A blocked flue could be the cause of condensation.
- Do not use an airing cupboard to dry clothes that is not ventilated.
- If washing is put to dry, open a window or turn on the extractor fan enough to ventilate the room. (For example, in a bathroom or kitchen.) Do not leave the door open or moist air will spread to other rooms where it may cause trouble.
Provide reasonable heating
- Try to make sure that all rooms are at least partially heated. Condensation often occurs in unheated bedrooms.
- To stop condensation, heat has to keep room surfaces reasonably warm.
- It takes a long time for a cold building structure to warm up.
- Better to have a little heat for a long time than a lot of heat for a short time.
- House and flats left unoccupied and unheated during the day get very cold. Wherever possible, it is best to keep the heating on, even at a low level.
- In houses, rooms above a heated living room can benefit from heat rising through the floor.
- In bungalows and in most flats this does not happen.
- Some rooms can be cold because they have more outside walls or lose heat through a roof as well. These are more likely to have condensation and some heating is needed.
- In cold weather, even insulated homes with ventilation can need rooms to be at less 10oC to avoid condensation.
- When living rooms are used they be raised to around 18oC.
Mould growth
This shows the presence of moisture. If caused by condensation, it is a warning that improvements need to be made to:
- heating;
- structural insulation;
- ventilation;
- or all three.
New buildings
These often take a long time before they are fully dried out. Until they are, they need extra heat and ventilation, at least during the first winter. Allowance should be made for this.
It is important that they should be free to dry out. Final drying may only be able to take place inwards, such as flat roofs and concrete. Ceiling finishes, can prevent drying out and should not be added unless expert advice has been sort.
The effect of increased ventilation on appliances that burn fuel
- Fix an extractor fan or other change the ventilation in a room that has a gas or solid fuel appliance.
- Make sure you get advice from the appliance installer about the risks from toxic fumes.
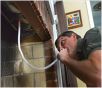
How to fit draught proof strips
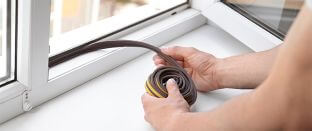
Controlled ventilation reduces condensation and damp by letting in fresh air when it is needed.
Draughts waste heat and let in too much cold air. Seal gaps that let warm air escape or cold air to enter your home to make it draught proof.
- For draught-strips to stick to the surface correctly, you must wash and dry the window/door frame. Use a sponge or towel to make sure it is clean.
- The strips should be cut to the lengths needed after taking your measurements.
- Apply the strip's adhesive side to the surface that the door or window closes against after removing the backing paper.
- If your gap is wider, you can attach the strips next to each other or on top of one another.
- Remove the strips if the door or window does not close properly after it has been applied.
How to use storage heaters and settings guide
How to use storage heaters

Most storage heaters are fixed to walls and look like radiators.
They charge up at night a cheaper tariff and release heat during the day. It depends on the energy company, but this happens between:
- midnight and 7am in winter;
- 1am and 8am in summer.
Note: The household's tariff must be Economy 7 for them to work right.
The input on your storage heater should be increased in order to hold more heat. The convector button (boost), if there is one, should not be used.
Knowing how to use them as efficiently as possible will help to keep you warm enough and save electric.
How to use immersion heaters for hot water
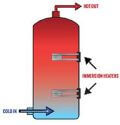
If you use storage heaters, it is likely that your water can only be heated by an immersion heater.
You could have two immersions, one in the top and one in the bottom of the hot water cylinder.
- The bottom one turns on at night to heat the whole cylinder on a cheaper off-peak tariff.
- If more hot water is needed during the day, the top one is used. This will be on the more costly peak-rate tariff.
Note: An Economy 7 immersion heater should not be left on all the time. Keeping water hot when you do not need it will cost a lot more.
Settings for Storage Heaters

Internal and external solid wall insulation
Solid wall properties can have insulation carried out internally or externally. Which one to do will depend on a number of things that will be checked when a survey is done.
Internal
- This can be fixed to timber studs or directly to the internal wall. This depends on a number of factors, such as:
- the insulation material used;
- and the existing surface condition of the wall.
Note: This could need a timber ladder frame behind insulated boards. - There are many different dry lining insulation products which can be used to improve the insulation in your home.
- The insulation material improves the thermal performance through the wall without changing the external appearance of the property.
- When the work is finished, the walls will be plastered ready to be decorated. There are normally minor alterations to the electrics and plumbing required.
- Depending on how thick the product used is, there will be a slight reduction in:
- the floor space of rooms;
- and head height in attics.
- The work can be carried out on a room-by-room basis reducing the inconvenience during the works.
- The ideal time to include internal dry-lining insulation would be:
- when you are changing the major fittings in the kitchen or bathroom;
- or planning to redecorate a room, .
Cost
Around £5,500 to £8,500.
- This will depend on the number of rooms being renovated and the materials used.
- It tends to be cheaper than external solid wall insulation, due to lower material and labour costs.
Savings
Insulate internal walls and houses that uses gas heating could save on their bills each year around:
- £260 for a typical 3-bed semi.
- £430 for a detached house.
For more about this, visit: Solid wall insulation - internal (cse.org.uk).
External
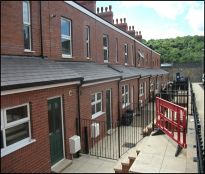
(Example insulated brick cladding system.)
(Example of insulated rendered system.)
Cost
On average, around £13,000.
- This depends on the size of the building and the number of outside walls to insulate.
- It is likely to be more expensive than internal wall insulation, due to higher material and labour costs.
Savings
Insulate external walls and houses that uses gas heating could save on their bills each year around:
- £300 for a typical 3-bed semi.
- £700 for a detached house.
For more about this, visit: Solid wall insulation - external (cse.org.uk)
Both internal and external insulation
- Can help reduce condensation in a property.
- Heating bills can be reduced by 35%.
- The typical guide price would be £60 to £95 per m2. This would depend on how thick the insulated board is. Each property will need a survey and advice given before a quote is provided.
Light bulb fitting guide
15% of the average household's electricity use on lights. Change the bulbs you use and how you use them, you could reduce your costs and energy use.
Light Emitting Diode (LED) bulb should be the cheapest option. Over time, these will save you more money and they fit most light fixtures.
- Before you change a light bulb, be sure the power is off. The safest way to do this is to turn the big red power switch marked "off" on the fuse box.
- Check the wattage of the used bulb or light fixture. Replace it with one that has the same wattage or less. Place the bulb in a safe place that youngsters cannot access. Keep your fingertips away from the exposed light socket.
- To take out a bulb:
- Bayonet, turn it to the left while you hold it lightly, but firmly in your hands.
- Screw, turn it slowly anti-clockwise, until it is free from the socket.
- The LED should be inserted into the socket with a light, but strong push. Depending on the type of bulb fitting:
- Bayonet, turn the LED right until it locks into place.
- Screw, gradually twist clockwise until it will not turn any more.
- Restore the power and make sure the bulb turns on.